microsoft agent framework 把 agent 注册为 mcp server
Microsoft Agent Framework 提供了一套强大的工具,用于构建、编排和管理 AI 代理。该框架的一个核心功能是能够将 Agent 作为服务公开,以便其他应用程序(例如 IDE 插件)可以与之交互。这通过模型上下文协议(Model Context Protocol,简称 MCP)实现。
本文将指导你如何将一个简单的 AI Agent 注册为一个 MCP Server,并展示如何在 Visual Studio Code 中使用它。
准备工作
在开始之前,请确保你已准备好以下环境:
- .NET 9 SDK 或更高版本
- 一个有效的 Azure OpenAI 服务终结点和 API 密钥
- 一个 .NET 控制台应用程序项目
接下来,将以下 NuGet 包添加到你的项目中:
Microsoft.Extensions.HostingMicrosoft.Extensions.AIMicrosoft.Agents.AIAzure.AI.OpenAIModelContextProtocol.Server
步骤 1: 创建 AI Agent
首先,我们需要创建一个 Agent。在这个例子中,我们将创建一个简单的“笑话大师” Agent,它使用 Azure OpenAI 服务来讲述笑话。
1
2
3
4
5
6
7
8
9
10
11
12
13
14
15
16
17
18
using Azure.AI.OpenAI;
using Microsoft.Agents.AI;
using System.ClientModel;

// 你的 Azure OpenAI 凭据
var azureAiEndpoint = "https://<your-resource-name>.openai.azure.com";
var apiKey = "<your-api-key>";

// 创建一个 Azure OpenAI 客户端
AIAgent agent = new AzureOpenAIClient(
        new Uri(azureAiEndpoint),
        new ApiKeyCredential(apiKey))
    .GetChatClient("gpt-4o-mini") // 指定你的模型部署名称
    .CreateAIAgent(new ChatClientAgentOptions()
    {
        Name = "joker",
        Instructions = "You are good at telling jokes.",
    });
这段代码创建了一个名为 joker 的 AIAgent 实例,并为其提供了简单的指令:擅长讲笑话。
步骤 2: 将 Agent 转换为 MCP 工具
为了让 MCP Server 能够使用我们的 Agent,需要将其包装成一个 McpServerTool。这可以通过 AsAIFunction() 和 McpServerTool.Create() 两个扩展方法轻松完成。
1
2
3
4
using ModelContextProtocol.Server;

// 将 Agent 转换为 MCP Server 可以使用的工具
McpServerTool tool = McpServerTool.Create(agent.AsAIFunction());
AsAIFunction() 将 Agent 的调用逻辑封装成一个标准的 AI 函数,而 McpServerTool.Create() 则将其转换为与 MCP Server 兼容的工具。
步骤 3: 配置并运行 MCP Server
现在,我们可以使用通用的主机(Host)来配置和运行 MCP Server。我们将使用标准输入/输出(Stdio)作为通信协议,这对于本地 IDE 集成非常理想。
下面的代码展示了如何构建和配置主机:
1
2
3
4
5
6
7
8
9
10
11
12
13
14
15
16
17
18
19
20
21
using Microsoft.Extensions.Hosting;
using Microsoft.Extensions.DependencyInjection;
using Microsoft.Extensions.Logging;
using ModelContextProtocol.Server;

var builder = Host.CreateApplicationBuilder(args);

// (可选)配置日志记录
builder.Logging.AddConsole(consoleLogOptions =>
{
    consoleLogOptions.LogToStandardErrorThreshold = LogLevel.Trace;
});

// 配置 MCP Server
builder.Services
    .AddMcpServer()
    .WithStdioServerTransport() // 使用 Stdio 进行通信
    .WithTools([tool]); // 注册我们的 Agent 工具

// 构建并异步运行主机
await builder.Build().RunAsync();
完整代码 (Program.cs)
将以上所有部分组合在一起,你的 Program.cs 文件应如下所示:
1
2
3
4
5
6
7
8
9
10
11
12
13
14
15
16
17
18
19
20
21
22
23
24
25
26
27
28
29
30
31
32
33
34
35
36
37
38
39
using Azure.AI.OpenAI;
using Microsoft.Agents.AI;
using Microsoft.Extensions.AI;
using Microsoft.Extensions.DependencyInjection;
using Microsoft.Extensions.Hosting;
using Microsoft.Extensions.Logging;
using ModelContextProtocol.Server;
using System.ClientModel;

// 1. 创建 Agent
var azureAiEndpoint = "https://<your-resource-name>.openai.azure.com";
var apiKey = "<your-api-key>";

AIAgent agent = new AzureOpenAIClient(
        new Uri(azureAiEndpoint),
        new ApiKeyCredential(apiKey))
    .GetChatClient("gpt-4o-mini")
    .CreateAIAgent(new ChatClientAgentOptions()
    {
        Name = "joker",
        Instructions = "You are good at telling jokes.",
    });

// 2. 将 Agent 转换为工具
McpServerTool tool = McpServerTool.Create(agent.AsAIFunction());

// 3. 配置并运行 MCP Server
var builder = Host.CreateApplicationBuilder(args);
builder.Logging.AddConsole(consoleLogOptions =>
{
    consoleLogOptions.LogToStandardErrorThreshold = LogLevel.Trace;
});

builder.Services
    .AddMcpServer()
    .WithStdioServerTransport()
    .WithTools([tool]);

await builder.Build().RunAsync();
在运行此应用之前,请务必将代码中的 Azure OpenAI 终结点和 API 密钥替换为你自己的凭据。
在 VSCode 内使用 MCP Server
通过 WithStdioServerTransport() 配置,我们的 Agent 程序可以通过标准输入/输出与 VSCode 的聊天扩展(如 GitHub Copilot Chat)进行交互。
要实现这一点,你需要告诉 VSCode 如何找到并启动你的 Agent。
发布你的 Agent 程序
首先,将你的控制台应用发布为独立的可执行文件。在项目目录下运行以下命令:
1
dotnet publish -c Release -r win-x64 --self-contained
注意: 根据你的操作系统,将
win-x64替换为linux-x64或osx-x64。发布成功后,你会在
bin/Release/net9.0/<runtime>/publish/目录下找到一个可执行文件(例如MSAgentFramework.Learn.exe)。配置 VSCode
在用户目录(AppData/Roaming/Code/User)下新建 mcp.json 文件。
在
mcp.json文件中,添加servers.MSAgentFrameworkJoker配置,指向你刚刚发布的可执行文件。
1
2
3
4
5
6
7
8
9
10
11
12
13
14
15
{
  "servers": {
    "MSAgentFrameworkJoker": {
      "type": "stdio",
      "command": "dotnet",
      "args": [
        "run",
        "--project",
        "D:\\workspace\\MSAgentFramework.Learn\\MSAgentFramework.Learn\\MSAgentFramework.Learn.csproj"
      ]
    }
  },
  "inputs": []
}
1
2
3
请确保:
*   `model` 的值与你在代码中为 Agent 设置的 `Name`(即 "joker")相匹配。
*   `command` 的路径正确指向你的可执行文件。
与 Agent 聊天
保存
mcp.json文件并重启 VSCode。现在,打开聊天视图(例如 GitHub Copilot Chat),你应该可以在模型选择器(通常位于输入框的右侧)中看到你新注册的 “Joker Agent”。
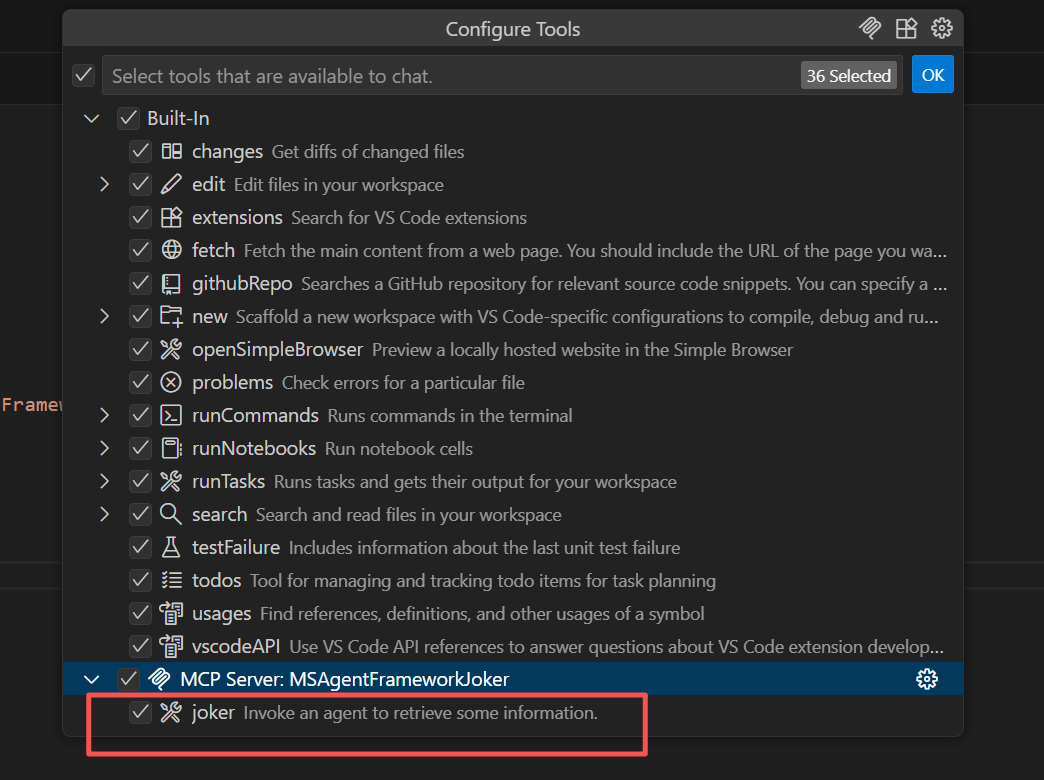
1
选择它,然后发送消息,如“给我讲个笑话”,你的 Agent 就会通过大语言模型生成一个笑话并回复你!
总结
通过将 AI Agent 注册为 MCP Server,你可以轻松地将其功能集成到支持该协议的各种工具中。WithStdioServerTransport 使得在本地开发环境中与 VSCode 等编辑器集成变得异常简单,极大地扩展了 Agent 的应用场景。